Thursday, 28 November 2013

Unknown

Evolution Of Java

  1. Java was designed by Sun Microsystems in the early 1990s.

  2. Basic aim of java was to solve the problem of connecting many household machines together.

  3. Project was unsuccessful because no one wanted to use it.

  4. Earlier Name of Java : OAK

  5. Creator of Java :  James Gosling  (the father of Java)

  6. As there was another language called Oak , they decided to rename OAK. New name was given 
    to OAK , OAK was renamed Java in 1994

  7. Java was publicly released on : May 27, 1995

  8. Java was targeted at :  Internet development

  9. Applets Had early support from companies : Netscape Communications
Read More

Wednesday, 27 November 2013

Unknown

Why java is called platform independent language?

One of the major features of java includes that why java is called platform independent language.
Before understanding this feature we need to know about -

Javac – compiler that converts source code to byte code. 
JVM- interpreter that converts byte code to machine language code. 
As we know java is both compiler & interpreter based language. Once the java code also known as source code is compiled, it gets converted to native code known as BYTE CODE which is portable & can be easily executed on all operating systems. Byte code generated is basically represented in hexa decimal format. This format is same on every platform be it Solaris work station or Macintosh, windows or Linux. After compilation, the interpreter reads the generated byte code & translates it according to the host machine. . Byte code is interpreted by Java Virtual Machine which is available with all the operating systems we install. so to port Java programs to a new platform all that is required is to port the interpreter and some of the library routines.

Source code -> javac ->Universal byte code
Universal byte ->jvm/java -> execute them on a particular machine.
Read More

Friday, 22 November 2013

Unknown

Funny Indian Troll Images for Fun Facebook Commenting

funny-comment-pics
Hmmm so now you can post images in facebook comments section, well people have just started up posting funny images in response to the post, well this is much more done by the Indians posting funny troll images of Bollywood actors and celebrities with some funny text written over it, well if you were also finding some of these awesome images then I have this awesome post for you which contains collection of those troll images which will take your commenting to whole new level.
So now all these images are compressed into a .zip package provided above directly for free download, so now just hit that button and get this package. Well you will need to extract the package to get funny pics folder which contains all above images. So now possibly these images will get updated soon I get few more, so till then enjoy using these image’s and have fun & do share this post with your friends too :)

Read More
Unknown

How to Obtain a Custom Username for Google+ URL

Google+ recently introduced custom URL for everyone who was eligible to get it for their personal profile, so earlier they gave the custom URL to all the big stars but now small newbies were in luck to avail this special feature to make their profile look much more short and simple.
Well now you might have received a email from Google+ regarding your profile username eligibility or you might have seen that notification bar if you are regular user of Google+ if you not we still have a simple way to avail this feature and get you a simple custom URL for your google+ profile page.


Now everyone is not able to get tis custom URL, well you need to have a proper userbase on Google+ in order to get this custom URL, well if you are a regular user then this feature would be surely available for you so let see how you can apply it.

  1. Visit Google+ and Sign-In.
  2. Now navigate to Profile > About, so now if you are eligible for this feature then you might be able to see a black bar sliding with text (your profile is eligible for custom URL) or scroll down to Links section and press Get URL.
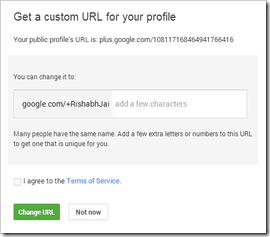
  3. google  custom urlNow you will see some popup like on the right hand side.
  4. So now if your was available you you will see a green arrow on the right, else you need to enter some more number's or alphabets in order to get your available custom name.
  5. Now after you see the green mark just press Change URL option and it will ask for confirmation that if you really wanna make a change with the name chosen.
  6. So now choose Accept and enjoy your new Custom Google+ URL.

So guys that's it now you will have a nice custom URL for your Google+ profile, have fun sharing this with all your friends, Enjoy.
Read More

Tuesday, 19 November 2013

Unknown

How to Block Unwanted Calls & Messages on iOS 7

Apple recently pushed the iOS 7 update bringing new user interface with all icons and HD graphics, well not only this they even added some awesome features like the call blacklisting that the one and the best feature added by Apple team. So now you could easily block any contact or unknown number and they would not be able to call you or send you messages and do facetime chat with you.

So now you do not need to install any other blacklisting app on your iOS device but just following below steps would allow you to block the user and that too using the default app and interface.

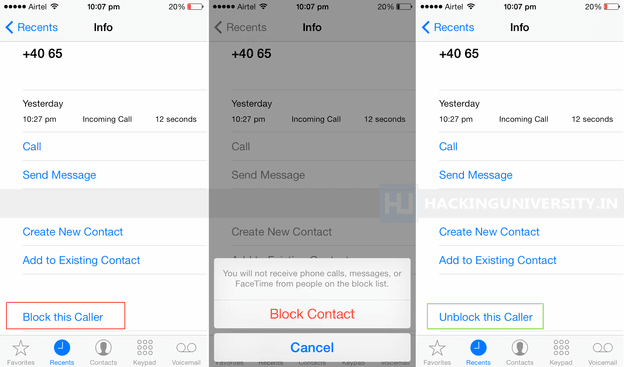
ios-7-call-blacklist
  1. Just open your Phone App > Call Log.
  2. Now in this just select the number you want to block and click that i icon on the right side and then scroll down to see the Block this Caller option.
  3. Now press that option and then it will slide and say Block Contact, just press that option and that's it your caller will be blocked.
  4. So now instead of Block this Caller you will see another unblocking option which says Unlock this Caller, so if you want to remove that caller from the block list just press that option and that caller will be removed from the block list.
  5. Now there is another way to see all the blocked users and even unblock them, just navigate to Settings > Phone > Blocked.
  6. So now you will see all the callers you have blocked, so swipe left on anyone to unblock them from the block list.
So that ends the tutorial, well remember the caller you will block will not be able to call you, send your messages and chat with you using Facetime, so make sure to only do this to someone who is really harassing you :)
Read More

Tuesday, 1 October 2013

Unknown

Forgot Android Lock Pattern 3 Methods to Unlock Device

Android introduced lock pattern security feature that looks awesome and encrypts your device securely, but this can be a problem in case you have forgotten your lock pattern or you have just entered them invalidly for a quit good times. So now you need to unlock your device and get back into your OS, well the one easy way is to bang your phone onto the wall and that might help you in getting rid of that filthy pattern but if you do not want to loose your phone then we have three simple ways that will allow you bypass your lock pattern on Android device.
 
Well first method includes a simple way of logging in to your Google account and then getting RID of that lock pattern but if you have forgotten your email too then the second method could handy that includes executing few lines of script in command prompt which will allow you to write any pattern and to get into your OS and the third one is hard resetting your device and deleting all the users data.


#1. Unlock Lock Pattern using Email Option

Well this is easiest and recommend way of getting rid of that lock pattern if it works, so you just need to add wrong pattern for 5 times and then if will show you the Forgot Lock Pattern option, then you can login through your Google account and bypass the lock pattern system on your device.


#2. Unlock Lock Pattern using Command Prompt

This is the second way and its confirmed by many online website's that it works great, so lets just hop into the tutorial on how it actually works.
  1. Connect your Android Device to your PC.
  2. Now open Command Prompt as an administrator.
  3. Now type below code into it and press enter. adb shell
    cd /data/data/com.android.providers.settings/databases
    sqlite3 settings.db
    update system set value=0 where name='lock_pattern_autolock';
    update system set value=0 where name='lockscreen.lockedoutpermanently';
    .quit

  4. Now you will some screen like below and then you can reboot your OS and now when your device boots up again try unlocking your device using any lock pattern and it will work pretty fine.
    cmd-prompt
  5. If you face any problem repeat same steps but instead of the above code try using adb shell rm /data/system/gesture.key and press enter and now try rebooting your device and see if it works.

#3. Unlock Lock Pattern using Hard Reset Option

So this is the third method and even developers this works like a charm too, well we will be using the inbuilt Android feature that's Hard reset (every phone has this feature) and this will delete all the user's data which will unlocks the device.

Note This method will remove everything from your device except stuff on your SD Card, so make sure you attempt it only if none above method works and you seriously need to unlock your device.
  1. Shut Down your Android Device.
  2. Now we need to hold few buttons combination in order to get our device booted in, well every phone can have different combination so normally its Volume UP + Power button so try that else use below from popular devices.
    • Nexus 7 - Volume Up + Volume Down + Power
    • Samsung Galaxy S3 - Volume Up + Home + Power
    • Motorola Droid X - Home + Power
    • Now these were the popular phones I know, but you have any other phone and above combination is not working then you can Google your phone combination keys and you will get something for sure :)
  3. So now as soon as you see your phone's logo you can release the Power but you should keep holding the Volume Button till you get into the Recovery Mode.
    android-recovery-mode
  4. Now you will see some screen like above just navigate to wipe data/factory reset using volume keys and then press Power button to activate it.
    wipe-android-data-factory-reset
  5. Now you will get the Yes and No option (Google is creative in this isn't it) so slide down to that Yes -- delete all user data option and press that.
  6. Now it will wipe clean your device and will remove all the restrictions and now you can once again login to your OS. Well you can see below video tutorial too for easier access to your recovery mode.
So possibly these were the three methods I think that can be used to unlock your lock pattern on Android Device, well if you think you have some other easiest way then do comment below I will add that method too :)
Read More

Sunday, 22 September 2013

Unknown

Make Free 10 Calls/Day for Unlimited Time using CrowdCall

Crowd Call is basically a new and secure concept for conferencing your friends or business clients right from your smartphone. With Crowd Call you get 10 free calls/day to call over 40 countries worldwide. There is no time limit for any call 1 call can be as long as you want and the person you are going to call does not need to have any app installed in his phone, he just needs to have a valid phone number and he can be invited into conference.
crowd call iphone android
The only thing you need is an iPhone or Android device installed with the Crowd Call app
and rest part is covered by crowd call itself, the other party do not need to have any app installed but just a regular number and they receive your call right by your own number.
So as you can see in the above image I am just calling my friend "Atinder" whom I just chose from my contacts list and than I just pressed the Call Now button and I got a message that crowd call is in progress and I will receive a call soon. So now I just received a call from Crowd Call and when you answer you need to press 1 to start calling other party.
Hmmm well now I hope I have cleared out everything well you can visit CrowdCall official website for apps download and further information. Thanks to my friend "Guneet Anand" for telling me about this wonderful app…

Remember You get 10 free calls per day which you can use to call over 40 countries, on iPhone at a time you can select 2 person to call together and after the call is connected you can again minimize the call and call another two persons and merge call together for free 5 person conference call, and also repeat this step fro more person adding.
Update As reported by users 1 call last for 1 hour, so you get approximately 10 hours daily free calling to 40 countries.
Read More

Tuesday, 17 September 2013

Unknown

Forgot Nokia Security Code Unlock it Instantly using USB

Security codes might prove useful in some situation when it really protects data theft but still sometime it can become a nightmare when you actually forget the security code of your device and you get few attempts to bypass it, so sometimes it works and sometime you do not have a luck. Well in that case we have a nice tool for you that works pretty well and will help you unlocking your Nokia Security Code instantly. Well now this process requires a connection through USB so if your device connects through a USB then this method will work and you could easily get rid of that security code on that device. Well we are going to use a small tool called "ANT" it's a tool developed by ANT team, well it's a unknown team behind this tool as I did not find any useful information on them.

Reset Security Code on Nokia Device's

So now lets just follow below simple steps and you will be good to unlock your Nokia device instantly. Note Make sure that your Nokia PC suite is entirely closed during this process for 100% success.
  1. Download ANT Unlocking Tool.
  2. Now after downloading this tool just extract the tool.
  3. Now after extracting the tool you will find simple.exe file, double click on it.
  4. Now just connect your device to your PC using USB Connection.
  5. If you have Nokia PC suite installed, make sure its closed.
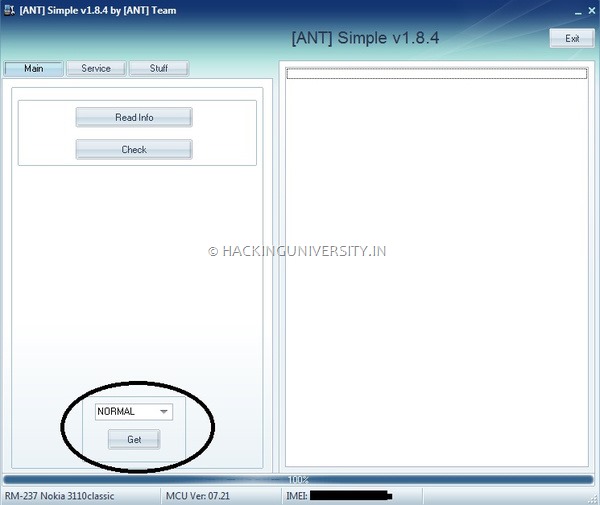
  6. Now on the ANT Main Tab choose Normal from the dropdown menu and click on Get option to get your device IMEI Number.
    ANT-IMEI-Number
  7. Now it will just display your device IMEI Number in the below status bar, so now you need to shift to the Service Tab.
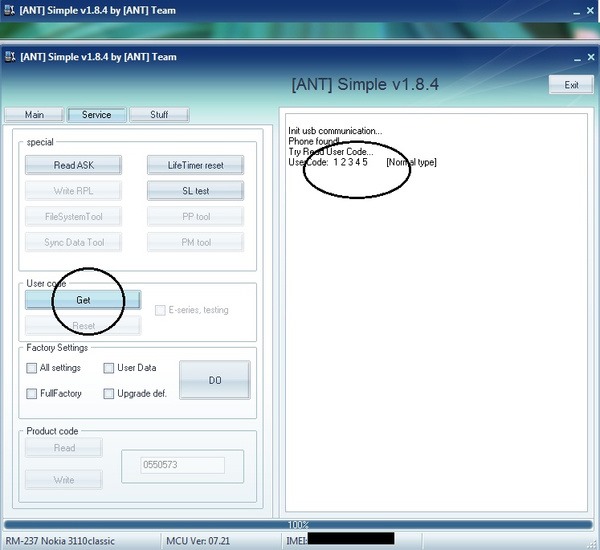
  8. Now in the Service Tab you need to on Get once again under the User Code option, so this will just start scanning for your user code and then it will display the code on the right hand side box like in the below image.
    ANT-Unlocking-Page
So that's it now your security code is visible and you can easily enter that to unlock or reset your device, well this tool even provides you all other options like Resetting your device to factory settings, and many other tools to upgrade your device.
So possibly this will end up helping in you in difficult times when you are not bale to unlock your device using your forgotten security code. So have fun and do share this post with all your friends if you found this tutorial little helpful :)
Read More

Saturday, 7 September 2013

Unknown

Automatically Logout from Facebook after Fixed Time

Facebook security is must these days as hackers are just exploiting you profiles stealing important data and then using to loop into other accounts and do much more cheesy stuff, so we have already posted some security measures you could take to protect your account like using HTTPS connection in facebook and even enabling 2 step verification as soon as it is enabled and even scanning your facebook profile using Safego Bitdefender profile scanner online tool.

So now even logging out from your account as soon as you have done doing everything could decrease the possibility of getting hacked and data theft. So now many times what happens is every time you login to your account and surf other sites you normally forget to logout of your account and anyone coming to that PC could use your account and post anything unknown stuff.
So now to protect all these activities "Facebook Auto Logout" extension pops in making logout step a lot easier and that too automatic. You just need to configure the timer according to your usage, so like it can be configured to logout your account after 10/min or in activity or so, this even logs you out as soon as you close browser.
  1. On Chrome install "Facebook Auto Log Out" [Link]
  2. On Firefox install "Facebook Auto-Logout" [Link]
  3. So after your extensions are installed you would be able to see the icon in your status-bar, so now on Firefox by default the timer is set to 1/min but obviously you can change it accordingly.
  4. fb-logout-timerBut if you are one Chrome you need to enable the timer by imputing the exact time you want your Facebook to be logged out, so you won't find any inactivity option for chrome but its straight forward, like you can see in the image on the right.
  5. So now just pop in the exact time make sure you fill every field else it will show error, now just start timer and see how automatically you get logged out of facebook.
So now this is the easiest way to log out and protect your facebook profile from preying eyes. Make sure if you are in any cyber cafe , do install these extension first before browsing facebook maybe these could help in getting security tight :)
Read More
Unknown

Get Notifications when Facebook Friends come Online

fb-online-friends-notify
Social networking has just changed out lives, we can now easily interact with anyone living aboard and even send them important file fro getting our business high. So now people just love to chat with anyone online and sending them emoticons and other funky text, well but still people are not attached to everyone and they just want a single person to chat with it can be there girl friend, relative or a high class business partner.
So now when they come online to when they go you are not notified about that, so you are left alone when ever they online you might offline or vise versa, but we have found two apps that could fulfill your wish for sending you notification as soon as your specified person comes online.
"Facebook Online Friends Notify" for Android phones and "Fav Alert" for iOS Devices pops up those notifications as soon as someone comes online. So you can mention the person you want to see notifications for, so you are not getting annoying notification's but only specified one's.
So now follow below steps to install the applications and then use them right on your device. You need to grant permissions.
  1. Install apps on your Android device and iOS Device.
  2. Now after installation open the apps and Sign In with your Facebook account, you will need to grant permissions to app for accessing your account.
  3. Now you need to specify persons you want to get notified as soon as they come online. So specify few person's
  4. That's it now as soon as that person comes online you will get notification like in the above image, so enjoy guys and have fun :)
Read More