Thursday, 31 August 2017

Blog No Baap

Chipotle-Corn Salsa


Ingredients 
  • 1 tablespoon avocado oil 
  • 1 1/2 cups fresh corn kernels (from 1 large ear) 
  • Salt and pepper 
  • 1/2 cup finely diced red onion (from about ½ small onion) 
  • 1 medium poblano chile, minced (about 1/2 cup) 
  • 2 small tomatoes, chopped (about 1 cup) 
  • 2 canned chipotles in adobo, seeded and minced 
  • 3 tablespoons fresh lime juice 
  • 1/3 cup chopped fresh cilantro 

Preparation 

Warm oil in a medium skillet over medium-high heat. Add corn, sprinkle with salt, and cook, stirring occasionally, until tender and beginning to turn golden, about 3 minutes. Add onion and poblano and cook, stirring, until corn starts to brown and onion and poblano soften, 2 to 3 minutes. Transfer to a medium bowl. (Alternatively, grill corn before removing kernels from ear. Slice onion and grill before dicing. Grill poblano, turning, until charred; remove skin and dice.) 

When corn mixture has cooled, fold in tomatoes, chipotles, lime juice, and cilantro. Season with salt and pepper. Serve or cover and refrigerate for up to 1 day to allow flavors to develop.
Read More

Tuesday, 29 August 2017

Blog No Baap

10 CSS Best Practice Tips

Here are some of the quick tips for best practices of writing CSS which we usually do not give more attention to while coding. These practices help in ease of development as well as maintain the standard compliance code. 

∗ Avoid using !important

It is a bad practice to use !important inside style sheets to override some CSS declarations. As a developer we find it very easy or lazy(!) to use !important rule to override a declaration in CSS, sometimes even when its not necessary. Instead, understand the CSS hierarchy and use of powerful selectors. 

Lets study an example to understand basic CSS cascading:

This is our HTML markup:

<body>
  <h1>Heading</h1>
  <p id="new">A paragraph of text.</p>
  <p class="new">A second paragraph of text.</p>
  <p class="new mytext">A second paragraph of text.</p>
</body> 


Let's apply multiple properties to same element. Below is our CSS rule set.


* {color: white} // This is universal selector which applies white color to all elements
p {color: red}  // This is generic selector
p#new {color:blue} // This is ID selector
Result: When web page is rendered, what would be the final style applied to "p" element?

Usually ID selectors have the higher priority above class selectors based on specificity. In our HTML page, we have <p> tag but with a specific ID #new so the color rendered will be blue and not red. 

Now lets add another rule:


p.new {color:blue} // This is first <p> with .new class selector
.....some css here.........
p.new {color:yellow} // This is second <p> with same class
Result: In this case, <p> tag color will be yellow. The reason is source ordering. p.new are declared twice but later one will be rendered.


If we need to apply blue color to all <p> tags with .new class except one with .mytext calss, we would simply strengthen the selector like,


p {color:red} //selects all <p> tags in a webpage
p.new {color:blue}
p.new.mytext {color:yellow} // This targets <p> with .new and .mytext classes 


In some cases, there will be few inline styles on elements which might be generated ones and not in our direct control. In such situations try to track the source ordering and strengthen your selector by finding parent class or ID and define a specific CSS rule to override. Use !important only in absolute necessary conditions. There is a detailed article on Smashing explaining about !important rule and cascading which is worth reading.


∗ Use CSS comments

Comments can be really useful to manage your CSS document. It navigates the author and makes it easy to identify the specific blocks of CSS rules inside the file. Provide proper information about all styles and fixes you provide in your stylesheet. It will be easy to manage in future for you as well as someone who might work on it in future at some point of time. 

A neat and properly organized LESS CSS document can look something like below. Notice the comments, consistent spacing and separated sections.

∗ Maintain consistency and standard

Yes, it is also a good practice to maintain the consistency of writing CSS rules. For instance,
  1. Break the line after each rule declaration and don't play one line game as eventually we are going to minify the code.
  2. Provide equal spaces throughout the document.
  3. Maintain comments and its method of writing along with formatting.
  4. Avoid too much extra space and breaks.
  5. Separate the blocks according to sections of the HTML document from top to bottom. It should be drafted as generic elements > reusable classes and groups > layout specific styles (from header to footer) > page specific styles if any > media queries > other fixes like IE hacks
  6. Combine selectors in group wherever possible. Be specific but only when you need.
  7. Use lesser hacks for browsers, instead use conditional comments. For CSS3 properties, make use of vendor specific prefixes.
See these points depicted in below image.

∗ Use shorthand properties

Use shorthand properties and values wherever possible. See below chunk of code.

.box {
  margin-top: 8px;
  margin-right: 10px;
  margin-bottom: 8px;
  margin-left: 10px;
}
button {
  padding: 0 10px 0 0;
}

This could be pretty written as

.box {
  margin: 8px 10px;          
}
 button {
  padding-right: 10px;
}

You can drop out the units for zero values as in above example. Also color codes can be written as short values. When possible use three character hex value for color code as #000 instead of #000000.

∗ Write semantic classes

I saw developers using classes such as .margin2px, .margin10px and so on. Avoid using such classes just for a single element, instead try to use combinations of parent child elements to override default style declarations. Use meaningful classes for example .editModal, .uploadModal and so on.

∗ Avoid negative margins

Do not use negative margins to hide something on page.

∗ No inline styles

This must be a common practice for developer to NOT to use inline styles inside HTML documents. It will mess up your page. Also it is easy to manage styles with proper CSS context. When you target only a single instance on a page, you may need to use inline CSS to make it look proper but do not overload the page by tons of inline styles unless it is a critical need.

∗ Code smart

Before creating CSS file with all bunch of styles, be thoughtful about the entire flow. Source ordering matters as we learnt in first section here. Disable some undesired user agent styles. For example IE browser shows outline to any image, hyperlink or form elements on the page which can be prevented using simple CSS rule as
img {outline:none}


Provide fallback for older browsers if required, especially when using new CSS3 properties

∗ Validate CSS

If possible, its good to validate CSS file using W3C validator.

∗ Compress CSS files

Lastly, compiling CSS code and compressing the files lead to faster loading of the site. It also reduces server requests if compiled in a single file. Use CSS optimizer and compressors to do the right job.
Read More

Sunday, 27 August 2017

Blog No Baap

Basic Points Developers Should Consider About Design

It has been observed that being a hard core programmer we forget to look at the obvious visuals of product or website. Visual appearance is the first priority of any product. Here are some tips worth keeping in mind as the ultimate goal is better product.

1. Follow User Centered Approach

I observed some developers skipping very obvious issues of design considering it is not something that they have to look into. Remember, the ultimate goal for any development is user or clients. What matters at the end is quality of overall product.

Simply take an example of buying a car. Compare two cars. Both are of same brand, features, functionality and color. 

Car1 has a very little scratch of white color on the window side and so the price was little reduced. Car2 is absolutely brand new.
Which car you would prefer to buy?

It is obvious that we will not compromise on quality while buying some expensive things. Apply the same rule when working for your clients or users. This will help in avoiding rework, increasing knowledge of overall product not just functionally but visually too. After all only team work brings perfection.

2. Think Like a Leader

Take ownership for the quality of entire work and not just the chunk of programming code or design elements of the page. The product delivery is based on completion of each small task from all team members. Every individual, when thinks like a sole owner of the product, is ultimately a leader. So think of working in a team of leaders and you will give your more than 100% on it.

3. Avoid High Dependency

Instead of keeping things on hold and depending on designer for each small fix, try to learn basic HTML, CSS tricks which can help you resolve small issues. For example applying some spacing to an element or aligning text on the page doesn't always require a designer/front end developer. Any developer can do this by learning through simple tutorials. I suggest to refer W3C School tutorials for beginners. If you are not sure of the change, attempt it and then get it reviewed by the designer.

Moreover, try to compare developed product with its original layout/prototype provided. Develop visual skills. Ask for help if required. Anything learnt will be an add on to your own knowledge.

4. No to Typo

Sometimes we all make spelling or grammar mistakes which is absolutely NO-NO rule for any product delivery. Believe me, such sloppy mistakes lead to bad impression. The editors we use do not accept typo in tags; thus we are safe while writing syntax of any code. We are safe while writing emails too as these editors also check spellings for us. But when we compose a sentence, for example developers usually write validation / error / success / information messages for the forms used on the site, there are chances of inaccuracies. However, we may not be able to notice and prevent these minor but very important human errors completely but we do have the alternatives to avoid them. 

Once the content is ready, test it with any tool of your choice for the final proof reading. Keep this habit as a part of your unit testing and make the entire content seamless. 

5. Other Misc Check Points

Make a regular practice to follow these hacks along with development. This will save you in many ways!

Check Alignments: 
Look for odd alignments on the page for example buttons, headings, navigation, footer and so on. These are dominant areas for the first impression of any website. Make sure they are properly aligned and directly visible or accessible to users.

Seek consistency: 
  • Check for consistency in colors applied on the site. For instance, check hyperlinks. They should be distinguished from other content usually. Hyperlink states - Hover, active, visited should be all applied consistently throughout the website. Moreover anchors should have tooltips (title attributes) wherever possible.
  • Likewise, look for heading, sub heading colors.
  • Another factor is font size and its type. It should be as per the layout and consistent in all the web pages.
  • Button elements can be checked for identical styles, including various states (hover, focused), over the web.
  • Each prominent element on the site should be consistent in terms of layout, style, colors, fonts, and states if any.
Responsiveness:
Take a quick overview of the site in various browsers and devices with different resolutions to check functionality as well as any layout distortions, dead ends, dead links or inaccessible areas. 

Feel free to add more in comments if you have such points. 
Read More

Friday, 25 August 2017

Blog No Baap

Green Tomato and Onion Curry

I’m very fussy about tomatoes. I love the sundried variety but not in pesto. I like the raw variety but only paired with basil and mozzarella and in a ‘cachumbar’ (salad) with sliced onions, red chilli powder and salt. But I love cooked tomatoes. Especially in curry. It’s my go to dinner when I am ravenous but don’t have the patience to wait. I usually eat this with some plain basmati rice or leftover boiled barley or kicheree.

I have used green tomatoes because I like the unusual. You could use cherry tomatoes cut in half or the different coloured heritage tomatoes that can be found at farmer’s markets nowadays. Which ever you choose, make sure they are lovely and firm so they will keep their shape when cooking.


TOMATO AND ONION (SHAK) CURRY


  • 2 tbsp vegetable oil
  • 1 heaped tsp small black mustard seeds
  • 1 heaped tsp cumin seeds
  • 4-5 curry leaves
  • 1 medium onion
  • 1 clove garlic
  • 250g red or green tomatoes – it doesn’t matter as long as they are firm and tomatoey! Don’t buy the cheap economy ones
  • 1.5 tsp salt
  • 1/4 tsp turmeric powder
  • 2 tsp dhana jeeru (coriander and cumin powder)
  • 1-2 tsp red chilli powder – more as you wish
  • 1/2 tsp amchur (dried mango powder) – optional but adds a tangy twist
  • Handful fresh coriander – chopped
To make it 
  • Slice the onion and garlic and chop the tomatoes into nice large chunks.  About 1 inch is good.  Smaller will turn them to mush and you don’t want that. Set aside
  • Heat the oil in a wok or large saucepan – not heavy bottomed. This is a stir fry type dish.
  • When the oil is hot add the mustard seeds, cumin seeds and curry leaves in quick succession.  To test the oil you can pop in a mustard seed. If it fizzzles and pops then it’s ready.
  • The seeds will crackle and fizzle and spit up so be careful when you add the onions and garlic now.
Frying Onions
Frying onions is one of my favourite smells
  • Stir for a minute with a fork (not wooden spoon as this will absorb the spices you are going to add)
  • Add the tomatoes and then the rest of the spices and stir until all the spices are well combined.
Green Tomato and Onion Curry
And then the spices go in and the smell gets even better
  • Keep tossing the onions and tomatoes with the fork for a few more minutes to cook the dry spices out and prevent sticking.  If it does stick add a little more oil or water.
  • Do not overcook.  you want the onions to have a little bite and the tomatoes to keep their shape.
  • Pour into a serving bowl, top with the chopped coriander and eat straight away.  This dish does not keep well so try not to have any leftovers!
I served these on Clearspring Quick Cook 5 Grains but you could also go with plain rice.
Green Tomato and Onion Curry
Read More

Tuesday, 22 August 2017

Blog No Baap

Tuples in C# 7.0

What is a Tuple?

A Tuple is a finite ordered list of values, of possibly different types, which is used to bundle related values together without having to create a specific type to hold them or else we can say Tuple is a temporary grouping of values.

so, a tuple is basically a data-structure. A tuple has a specific number and order/sequence of elements. The .NET Framework directly supports tuples with one to seven elements. In addition, you can create tuples of eight or more elements by nesting tuple objects in the rest property of a Tuple<T1, T2, T3, T4, T5, T6, T7, Trest> object.

We may often write methods which return multiple values so we need to create a simple structure containing more than one data elements. To support these scenarios, tuples were added to C#. Tuples are lightweight data structures that contain multiple fields to represent the data members.
Here you can find how tuple can be used, Look at the following example:

(string, string, string) GetEmployee(int id) { //Retrieve data from database return (address,age,designation); } 

The method above returns three strings.
var emp = GetEmployee(int id) ; //here is the caller function WriteLine($"Employee: {emp.Item1} {emp.Item2} {emp.Item3}.");

Instead of using default names Item1, Item2 etc.we can use property itself, For that we can define property names in return values as shown in the following example:
(string address, string age, string designation) GetEmployee(int id) var emp = GetEmployee(id); WriteLine($"Employee {emp.address} {emp.designation}.");e caller function WriteLine($"Employee: {emp.Item1} {emp.Item2} {emp.Item3}.");

we can also specify element names directly in tuple literals:
return (address: address, age: age ,designation: designation);

So that was all about tuples and since every coin has two sides let's see the advantages and disadvantages of tuples.

Advantages and when to use a tuple

  • Returning multiple values from the function/method.
  • Composite Key in a dictionary.
  • Easy access and manipulation of a dataset.
  • Replacement of a class whose sole purpose is to carry around data and bind a combo box or other control.
  • Pass multiple values to the function/method.

Disadvantages and When to avoid.

  • Tuples are classes, not structs so it would be allocated on the heap rather than the stack so its kind of overhead on the garbage collector.
  • Tuples are not so syntactically mature so the code is less readable, so use it for internal classes but avoid exposing them to external classes.
  • You can't document the passed in parameters.
  • Sometimes key-value pairs are not just sufficient for our requirements, go ahead and try tuples in those scenarios.
Read More
Unknown

NEW PASSPORT RULES, YOU NEED TO KNOW

Recently, the Ministry of External Affairs declared new rules for applying for a passport. And here we have rounded up some of the major changes that these new rules have bought in.

  • DOCUMENTATION FOR PROOF OF BIRTH
As per old rules, submission of a birth certificate was compulsory for all applicants born on or after 26th January 1989. But the new rules have bought in some relaxation in this regards. Now, any of the following documents containing the Date of Birth (DOB) of the applicant will suffice:
  • Birth Certificate (BC) issued by the Registrar of births and deaths or the Municipal Corporation or any other approved authority to register the birth of a child born in India
  • Transfer/school leaving/matriculation certificate issued by the school last attended/recognized educational board
  • PAN card
  • Aadhar card/E-aadhar
  • The copy of the service record of the applicant’s (of govt. servants) or the pay pension order (of retired govt. employees), duly attested/in-charge of the administration of the concerned ministry/certified by the officer/ department of the applicant
  • Driving license
  • Election Photo Identity Card (EPIC) issued by the Election Commission of India
  • A copy of policy bond issued by the public life insurance companies
  • DETAILS OF PARENT/LEGAL GUARDIAN:
In a welcome move, the new passport rules has done away with the mandate requiring names of both parents at the time of application. An applicant now only needs to provide the name of either one of the parents or the legal guardian. This makes it easier for children with single parents or orphans to apply for a passport. For spiritually oriented people like Sadhus/Sanyasis, there have provisions made for them to mention the name of their spiritual leader in place of their biological parents.
  • ANNEXES
The total number of annexes has been reduced from 15 to 9. Annexes A, C, D, E, J, and K have been eliminated and some of them have also been merged. Lesser annexes means less worry for people to collate documentation.
  • ATTESTATION
While all annexes needed attestation from a Notary/Executive Magistrate/First Class Judicial Magistrate previously, henceforth all these annexes can now be in the form of a self-declaration from the applicant on plain paper. This means no running around for attestation that one had to do previously.
  • MARRIED/DIVORCED PERSONS:
The need for a marriage certificate has been discontinued (along with annexure K). Also, in case of a divorce the applicant will not be required to provide the name of their spouse. This is another interesting change that has been made taking into consideration changing societal norms.
  • WORK RELATED URGENT PASSPORTS:
    In case of urgent passports, if a government employee is not able to procure the NOC (no objection certificate) or identity certificate from their employer’s side, they can submit a self-declaration stating that they have given a prior intimation letter to their employer informing that they are applying for an ordinary passport to a passport issuing authority.
To view the press release from the Ministry of External Affairs with regards to the new passport rules, you can visit their website to gain detailed information.
Overall, this move is set to make the application process easier and hassle-free for everyone. A welcome move, we say!
Read More

Saturday, 19 August 2017

Blog No Baap

30 Powershell Commands Useful For Every SharePoint Developer

I have been working on SharePoint since long time and I find the PowerShell Cmdlets to be the most useful feature of SharePoint. PowerShell Cmdlets is the most useful stuff for every SharePoint Developer and also Administrators for configuration and provisioning applications and services.

There must be more than 500+ such cmdlets available, but I would like to share some of the cmdlets that are useful day-to-day to SharePoint Developers.


How to use the PowerShell Cmdlets?
There are two ways to use these PowerShell Cmdlets:
1) From the SP2010 Management Shell
This opens a PowerShell Console session with all the cmdlets loaded.

2) Adding the Microsoft.SharePoint.PowerShell snap-in 
Open a new PowerShell window, add the Microsoft.SharePoint.PowerShell snap-in to start using the cmdlets.

The Cmdlets

Add Solution 
Add-SPSolution <literal path of wsp file> 
Deploy Solution 
Install-SPSolution -Identity <solution_file (WSP Name)> -GACDeployment
Uninstall Solution
Uninstall-SPSolution –Identity "solution_file (WSP Name)".wsp –WebApplication "Site URL"
Update/Upgrade Solution
The Update-SPSolution cmdlet upgrades a deployed SharePoint solution in the farm. Use this cmdlet only if a new solution contains the same set of files and features as the deployed solution. If files and features are different, the solution must be retracted and redeployed by using the Uninstall-SPSolution and Install-SPSolution cmdlets, respectively 
Update-SPSolution -Identity "solution_file (WSP Name)" -LiteralPath <literal path of wsp file> -GACDeployment
Install Feature 
Install-SPFeature -path <literal path to the 15\Template\Features directory.> -CompatibilityLevel 15

Uninstall Feature
Uninstall-SPFeature -Identity <Feature Name>
Enable Feature
Enable-SPFeature -identity <Feature Guid> -URL "Site URL"

Get the list of features from site sorted by ID
get-spfeature -site "Site URL" | Sort Id
Get the list of features from site sorted by Name
get-spfeature -site "Site URL" | Sort Displayname

Get the list of features from site sorted by ID
get-spfeature -site "Site URL" | Sort Id
Get the list of features from site sorted by Name
get-spfeature -site "Site URL" | Sort Displayname

Take Site Backup
backup-spsite -identity <Site URL> -path "literal path to save backup file"

Restore Site Backup
Restore-SPSite -Identity <Site URL> -Path <literal path to save Backup file> [-DatabaseServer <Database server name>] [-DatabaseName <Content database name>] [-HostHeader <Host header>] [-Force] [-GradualDelete] [-Verbose]

Synchronise the AD User Data with User Profiles in SP Site
Get-SPUser –Web http://SharePointServer | Set-SPUser –SyncFromAD

Backing Up an Entire Web Application
backup-spfarm –BackupMethod Full –Directory C:\Backup\ -Item http://server
Backing Up the Farm Configuration
backup-spfarm –BackupMethod Full –Directory C:\Backup\ -ConfigurationOnly

Create a Web
New-SPWeb –URL "Web URL" -Verbose

Export a Web
export-spweb -identity "Web URL" -path "<literal path>\<backup file name>.cmp"
Import a Web
Import-SPWeb -Identity "Web URL" -Path "<literal path>\<backup file name>.cmp" -IncludeUserSecurity -UpdateVersions Overwrite

Export a List
export-spweb -identity "Web URL" -path "<literal path>\<backup file name>.cmp" -itemurl "/<listname>"

Import a List
Import-SPWeb -Identity "Web URL" -Path "<literal path>\<backup file name>.cmp" -IncludeUserSecurity -UpdateVersions Overwrite

Find List Name from Id
Get-SPSite "Site URL" | Get-SPWeb -Limit ALL | %{$_.Lists} | ?{$_.ID –eq "<List ID>"} | ft Title, ParentWebURL, RootFolder
Assign User as Site Collection Administrator
Get-SPSite -Identity "Site URL" | %{Set-SPSite $_ -OwnerAlias "username" -SecondaryOwnerAlias "username"}
Get list of deployed solutions
$SPfarm = [Microsoft.SharePoint.Administration.SPFarm]::get_Local()
$SPfarm.get_Solutions()

Download the WSP that you have deployed in a SharePoint farm
$frm = Get-SPFarm
$file = $frm.Solutions.Item("Name of Solution i.e.WSP file name").SolutionFile
$file.SaveAs("literal path to save wsp file")

Get User Info
Get-SPUser -Web "Site URL" | Where { $_.UserLogin -LIKE "*|domain\username" } | Select ID, UserLogin, DisplayName
Get SharePoint Groups from Site Collection
Get-SPSite "Site URL" | Select -ExpandProperty RootWeb | Select -ExpandProperty Groups | Select {$_.ParentWeb.Url}, Name
Get All Users from SharePoint Group
Get-SPSite "Site URL" | Select -ExpandProperty RootWeb | Select -ExpandProperty Groups | Where {$_.Name -EQ "<Group Name>"} | Select -ExpandProperty Users | Select Name, Email
Get SharePoint Groups of given user$user = Get-SPUser -Web "Site URL" | Where {$_.LoginName -LIKE "*|domain\username"}
Get All Site Owners and All Site Collection Administrators
Get All Site Owners:

$web = Get-SPWeb "Site URL"
$web.AssociatedOwnerGroup.Users

Get All Site Collection Administrators:
Get-SPSite -Limit All | Select Url, Owner, SecondaryContact
Doing such stuffs in the SharePoint UI, takes at least 5-10 minutes, but with PowerShell it takes only seconds!

I will post some more cmdlets from administration and configuration point of view in some future post. Till then enjoy using PowerShell Cmdlets 🙂
Read More

Thursday, 17 August 2017

Blog No Baap

10 Techniques to Achieve Maximum Test Case Coverage

Any Software requirement or Application code is fully covered or not can be guaranteed by Test Case Coverage. Now a day, testing has reached at an advance level. Many testers are facing it as a challenge to achieve maximum test coverage at first cut. Here I am going to give few tips and techniques to achieve it.


1. Mapping the requirements to the test cases:
For this use Requirement Trace-ability Matrix. It will help to find out any requirements are missing or document inconsistency.

2. Functional Test Coverage:
We have to write all the test case as per the Functionality/Features mentioned under Specification.

3. UI/UX:
All UI icons, buttons, screens, tabs, menus, Validations etc. should be covered under test cases. So it will be helpful to the end users.

4. Use different test case design techniques like Equivalence Partitioning (EP), Boundary Value Analysis (BVA) and Decision Table.

5. Structure (Code Coverage Analysis) Test Coverage:
Test Cases cover the minimum part of the code. Testing should cover Statement Coverage, Decision (Branch) Coverage, Condition Coverage, etc. so as per written code conditions testing can be achieved.

6. Test Case Coverage by integration(interaction)of different features/functionalities/modules:
Test Cases should cover the integration of different functionalities/features/modules. So it will help to test our application with different combinations.

7. Non-Functional Test Coverage:
Test case related to Security, Performance, Stress, Recovery, Usability should be included.

8. Test Case Coverage by Defect Analysis and Prevention:
Defect Analysis and Prevention is used to analyze defects which occur frequently and we can prevent defects to occur again and again.

9. Test Case Coverage by Ad-hoc testing OR Tester's instinct OR Gut Feel, experience based or error guessing:
With the help of Error guessing or Ad-hoc Testing we can find defect of the areas for which we have already doubts. So in advance we can prevent our Software to work in-efficiently. Also we have gut feeling that in this area there is definitely some defect and from that we can find feature which is not working properly.

10. Use Case based Test Case Coverage:
As per available use cases test cases can be develop to achieve test case coverage.

Testing is never ending process. We may not achieve 100% test coverage but we must minimize the risk by finding maximum bugs before shipping the product to customers. I hope that above tips will definitely help you to enhance your test coverage.
Read More

Tuesday, 15 August 2017

Blog No Baap

A Guide To Using Pinterest for Ecommerce Marketing

Every social networking website provides businesses an opportunity to get closer to their customers, boost engagement and increase sales. But specifically for e-commerce businesses and websites, Pinterest is by far the most effective social network.
If you’ve been ignoring Pinterest until now, here are a few stats to get you thinking.
  • Pinterest has more than 75 million registered users.
  • It ranks third, after Facebook and Twitter, in terms of generating daily referral traffic.
  • Almost 80% of its users are women.
  • Buyers referred from Pinterest are 10% more likely to buy your products.
  • Buyers are increasingly using Pinterest to find relevant products.
In short, Pinterest can play a huge role in your social commerce strategy. Not only can it send you thousands of qualified sales leads, it can also help you build a strong brand image.
Here’s how you can use Pinterest to strengthen your e-commerce marketing strategy.

Understand the Platform First

Although it has great e-commerce potential, Pinterest is still primarily a social network. So to find success, you need to reach out to your potential customers and people who might be interested in your products. The primary benefits you can get out of Pinterest are:
  • Engaging with your target audience and potential customers.
  • Increase visibility of your products.
  • Use the Pinterest audience to build your e-commerce business.
  • Get direct feedback from customers on products.
  • Improve your referral traffic.
Don’t expect direct sales though. Pinterest will work as an advocate for your products and send you referral traffic. But you cannot make direct sales on it.

Encourage Pinning on Your Website

Before promoting your products on Pinterest, create a strong case for it on your ecommerce website. This includes adding the “Pin” button on all your product pages and encouraging your website visitors to follow you on Pinterest. You can use social media sharing widgets like AddThis or DiggDigg to add the relevant social sharing buttons. You can also route members to your Pinterest page by announcing different competitions and special offers for Pinterest users on your website.

Create a Pinterest Business Page

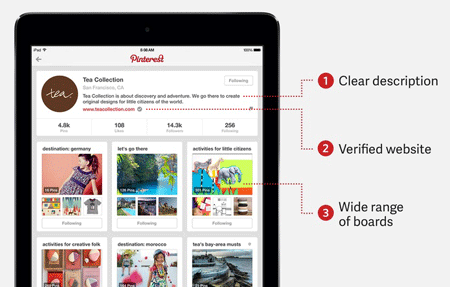
pinterest-business-page-example
If you’re serious about using Pinterest to market your products then instead of using a Pinterest personal profile, create a Pinterest Business page. Pinterest Business profiles are specially designed for organizations who wish to engage with their customers. To get a verified Pinterest Business page, you just need to confirm your website address. This will add further credibility to your profile and also make you eligible for additional features that individual profiles don’t have.

Enable Rich Pins Greater For Engagement

Research indicates that Pins that include a price tag attract 30% more Likes on Pinterest. There are two ways of adding a price tag to your Pins. You can either add the price in the product description or you could enable Rich Pins. Similar to Twitter cards, Rich Pins is a great feature for e-commerce websites. It automatically picks up the price and stock details from your product page and displays it with your Pinterest posts. For detailed instructions on configuring Rich Pins, click here.

Attract and Engage Your Followers

To be successful on any social network, you need to attract followers and then keep them engaged. To attract followers on Pinterest, shortlist other more active Pinterest accounts that are pinning about similar products. Proactively engage with the followers of those accounts by responding to their comments and answering any questions that they have left on different images. Also, whenever someone RePins or Likes your images, send them a thank you message. These small things gradually increase your followers. You can also run special contests on Pinterest and ask your website visitors to participate.

Curate Content Intelligently

For a successful Pinterest strategy, you need to be an active content curator. Don’t just share your own product pictures. Rather, Pin images from other users with similar interests. But you need to do this intelligently. Instead of pinning images from your competitors, pin images of products or things that complement your products. For example, if you’re selling sports equipment, apparel and gear, you can pin pictures of different sports personalities, or international matches being played in different countries.
Pinning images from other users adds more variety to your Pinterest profile and also helps you create new relationships, which is crucial on any social network.

Organize Your Boards and Pins

To make it easy for your followers to explore different products, organize your images in different boards. Again, instead of focusing only on your products, create a combination of original and curated boards. Create separate boards for every product category and add pictures from your website. Then create boards containing pictures that show different usages of your products in real life. Or you can create boards that contain different statistics and facts about your products. The possibilities are endless. Just make sure your profile is well organized and easy to explore.

Use High Quality and Large Images

Pinterest is a visual social network. People click only on high quality images. Make sure all your product images and Pins are of the highest quality. Research also shows that taller and larger images get much more engagement as compared to smaller images. In general, images that are 738 pixels wide and 1128 pixels high appear the best.

Add Clear Calls To Action

Research shows that Pins that have clear calls to action in their description or image content, drive almost 80% more engagement. Since your primary objective with Pinterest is to drive traffic to your e-commerce website, you should always include clear calls to action in the image description. A call to action is a sign or statement asking the user to take a specific action. For example, “Click Here”, Download Now”, “Register Now” etc. To make it more compelling, use questions or statements that require a response from the user. Combine this with different calls to action to get the most out of your Pins.

Use Pinterest for SEO

Over time, Pinterest has proved to be a great source of referral traffic for websites because of its SEO strength. To get the maximum benefit from it, use descriptive names for your images and add descriptions with every Pin, along with the product URLs. Use the keywords that best describe your products. But avoid keyword stuffing. Using too many keywords can put people off, and reduce the engagement on your Pins. Create natural descriptions and image names with keywords where necessary.

Monitor Performance With Analytics

To monitor your progress on Pinterest and see which posts are getting the highest exposure, you can use the built-in Pinterest analytics. These statistics are only available to Pinterest Business users, so you’ll need to sign up for a business page. Analytics will show you the Pins with the highest reach, exposure, comments and likes. Plus, you’ll also get details about the demographic and geographic details of your followers.
Read More